Help & tutorials

Short videos that show each step in the app. No sound needed.

Meters

Add a single-tariff electricity meter

A normal meter with one counter. Most homes have this meter.

  1. Open the menu, tap Electricity, then the + button.
  2. Enter the meter number exactly as printed on the meter. Give the meter a name you will recognise, for example "Flat" or "Garage".
  3. Choose Single tariff.
  4. Enter the number shown on your meter today as the Initial reading, and check the Reading date. If you wrote the number down on an earlier day, set that date.
  5. The postal code is optional. In Germany it unlocks the AI features for this meter.
  6. Save. The app asks whether it should remind you to read the meter: choose the day, time and repeat, or skip it.

Take care

  • The meter number is on the meter, usually on a label near the display, and on every bill. In Germany it is called "Zählernummer".
  • The initial reading becomes the first reading of this meter. Usage and charts appear from the second reading.
  • A contract is optional. You can add it later on the meter page.
  • Each meter can have one reading reminder. You can add or remove it later on the meter page. Notifications must be allowed on your phone.
Add a day/night meter (HT/NT)

Two counters: one for day (HT), one for night (NT). The app keeps them apart.

  1. Start like a single-tariff meter: open the menu, tap Electricity, then +, and enter the meter number and a name.
  2. Choose Dual tariff.
  3. Enter the day reading (HT) and the night reading (NT). Your meter shows both, often marked 1.8.1 and 1.8.2.
  4. Check the Reading date and save.

Take care

  • Every later reading needs both values. The app shows day and night usage separately.
  • A contract for this meter has two prices per kWh: HT (peak) and NT (off-peak). Both are on your contract or bill.
  • If you chose the wrong tariff type, change it later under Edit Meter.

Add a solar meter (two-direction)

For solar panels with a two-direction meter: energy taken from the grid (1.8.0) and energy given to the grid (2.8.0).

  1. Start like a normal meter and choose Solar.
  2. Enter the counter for energy taken from the grid (1.8.0) as the Initial reading.
  3. The counter for energy given to the grid (2.8.0) is optional. Enter it if you want to see what your panels feed in.
  4. Check the Reading date and save.

Take care

  • Usage, charts and everything else use the "taken" counter. The "given" counter shows your feed-in.
  • In the contract, the feed-in price per kWh is optional. With it, the app shows an approximate earned amount on the contract card and under the chart. It is an estimate, not a replacement for your provider's statement.
  • If you switch a solar meter to another tariff type later, its given-to-grid readings are hidden, not deleted.

Edit a meter

Rename a meter, change its tariff type or add a postal code later.

  1. Open the meter by tapping it in the meters list.
  2. Tap ⋮ at the top, then Edit Meter.
  3. Change the name, the tariff type or the postal code and save.

Take care

  • Your readings, charts and contracts stay when you edit the meter.
  • A solar meter switched to another type hides its given-to-grid readings; they are not deleted.
  • Delete Meter removes the meter with all its readings, charts and contracts. This cannot be undone.

Readings

Add and edit a reading

Enter a reading with the digit wheels and correct it later.

  1. In the meters list, tap Add Reading on the meter, or tap the reminder notification.
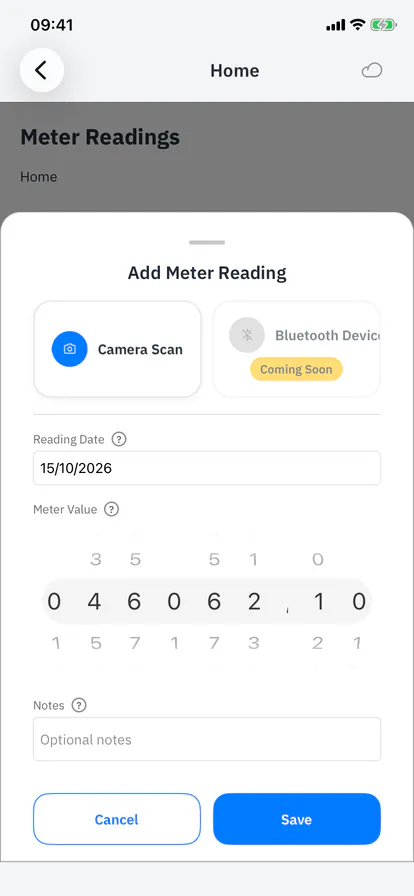
  2. Turn the wheels until they show the number on your meter.
  3. Check the Reading date. You can set an earlier date if you noted the number before. Then save.
  4. To correct a reading: open the meter's readings, tap ⋮ on the reading, then Edit. Delete removes it.

Take care

  • A reading must not be lower than the previous one or higher than the next one. The app refuses other values.
  • Usage is the difference between two readings, so charts start from the second reading. Regular readings give better charts.
  • After the second reading, the app offers to create a chart.
  • With the optional AI, you can read the number from a photo of the meter. Check the result before you save.

Read a meter with the camera

With an Activated Account the app can read the counter from a photo. You point the camera at the meter, the AI reads the number and you confirm it.

  1. Open the meter, tap View Records, then the + button to add a reading.
  2. Tap Camera Scan. The first time, the app asks for your consent to send the photo to the AI service and for camera access.
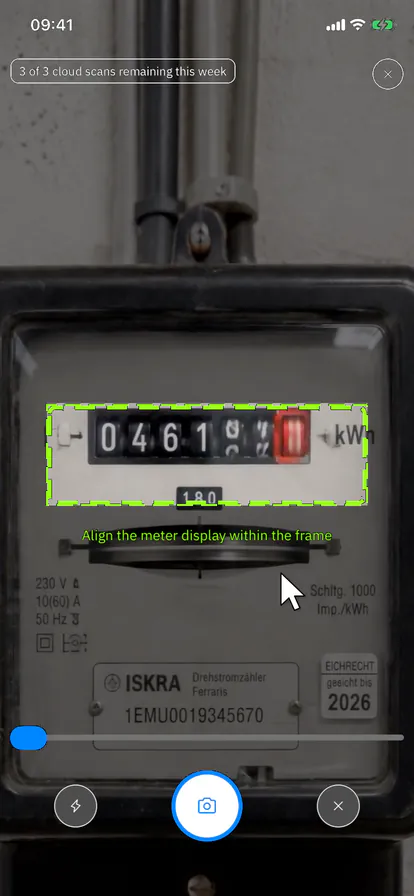
  3. Hold the phone so that the counter sits inside the green frame; use the zoom slider if the digits are small.
  4. Tap the round capture button. "Analyzing meter reading…" is shown for a few seconds.
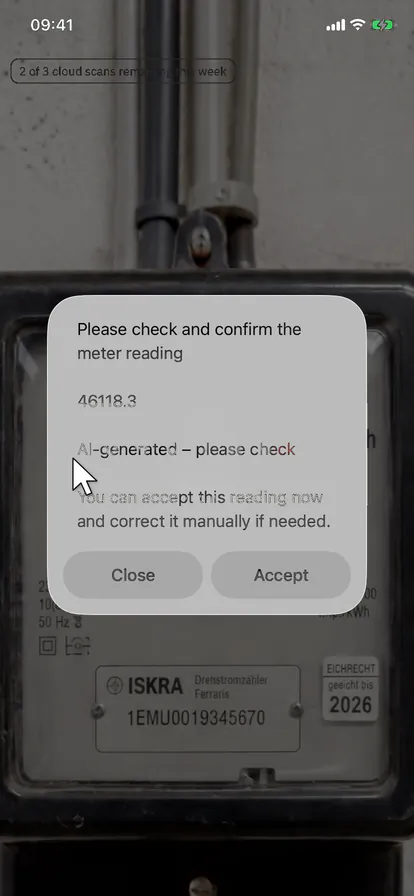
  5. Compare the number in the dialog with the meter and tap Accept. To try again, tap Close and take a new photo.
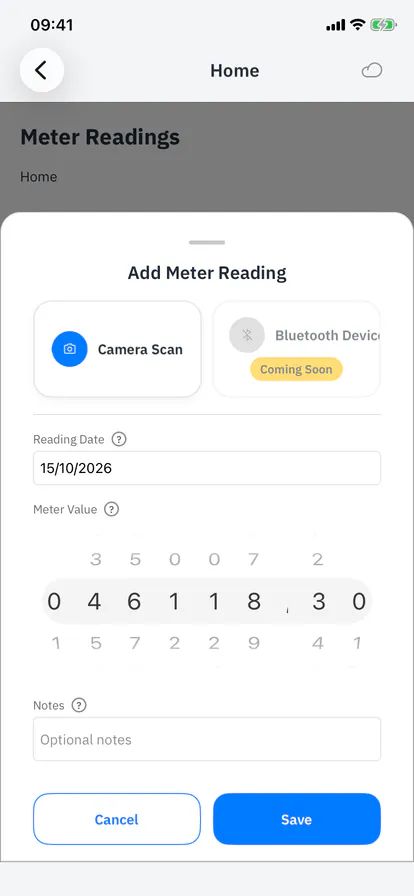
  6. The reading sheet opens with the digits set. Check the date and tap Save.
  1. Camera Scan on the add-reading sheet
    Camera Scan on the add-reading sheet
  2. The counter inside the green frame
    The counter inside the green frame
  3. The AI result to confirm
    The AI result to confirm
  4. The digits set on the reading sheet
    The digits set on the reading sheet
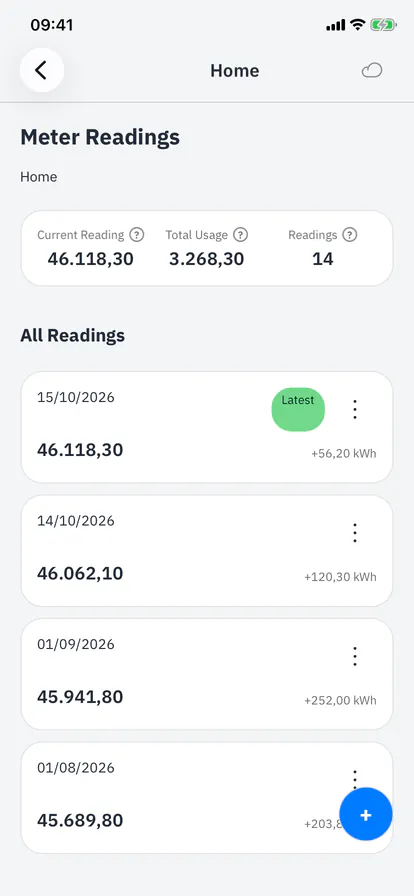
  5. The new reading in the list
    The new reading in the list

Take care

  • Only the strip inside the frame is sent, as a fresh image without location data.
  • You have 3 cloud scans per week; the badge at the top shows how many are left. A failed read does not count.
  • Good light and a straight angle matter more than a high zoom. Avoid reflections on the glass.
  • The red digit of a mechanical counter is the first decimal: 046118.3 becomes 46,118.30 in the app.
  • A reading must not be lower than the previous one or higher than a later one; the app checks that when you save.

Contracts

Add a contract to a meter

Prices, yearly usage, monthly deposit and contract period. The app can alert you before deadlines.

  1. Open the meter and tap Add Contract.
  2. Enter the provider name. Everything else can be filled in later.
  3. Meter reading at start: the reading on the day the contract began. You find it in the contract confirmation or on the first bill.
  4. Prices: the price per kWh, the service fee (Grundpreis) and the monthly deposit (Abschlag) are on your contract or your last bill. A day/night meter has two prices per kWh.
  5. Under Contract Period: contract start, duration, notice period, auto-renewal and price guarantee. Turn on "Notify me about deadlines".
  6. Save.

Take care

  • Deadline alerts: 30 and 7 days before the cancellation deadline, 7 days before a price guarantee ends, and 30 days before a contract without auto-renewal ends, at 9:00. Notifications must be allowed on your phone.
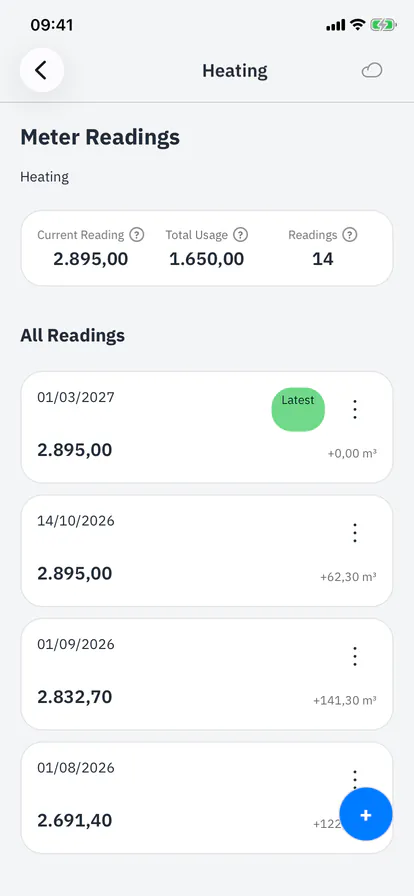
  • The start reading is linked to the meter's readings. To change it later, edit that reading on the readings page.
  • Up to 10 active contracts per meter type (electricity, gas). Expired and cancelled contracts do not count.
  • With the optional AI, a contract PDF or a bill can fill in the form. Check every value before you save.
  • To cancel: open the contract and tap Cancel Contract. The app prepares an e-mail; you check it and send it from your own mail app.

Let the AI fill in a contract from a PDF

With an Activated Account the app can read your contract confirmation or last bill as a PDF and fill in the form. You check the values and save.

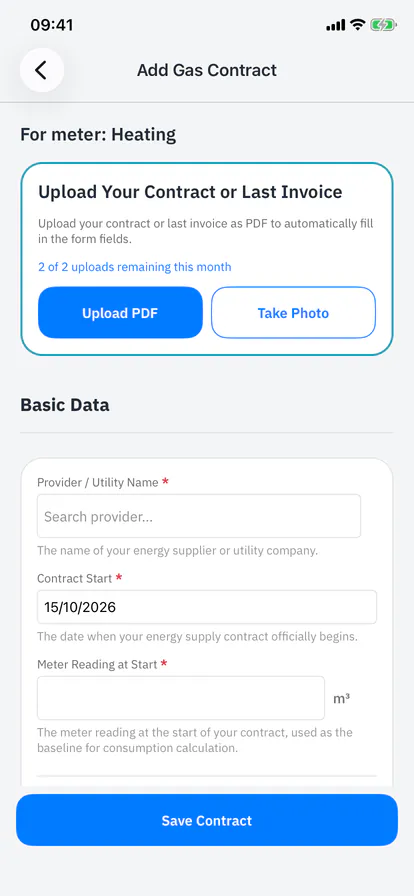
  1. Open the meter and tap Add Contract. The card "Upload Your Contract or Last Invoice" at the top shows how many uploads you have left this month.
  2. Tap Upload PDF. The first time, the app asks for your consent to send the document to the AI service; tap Accept.
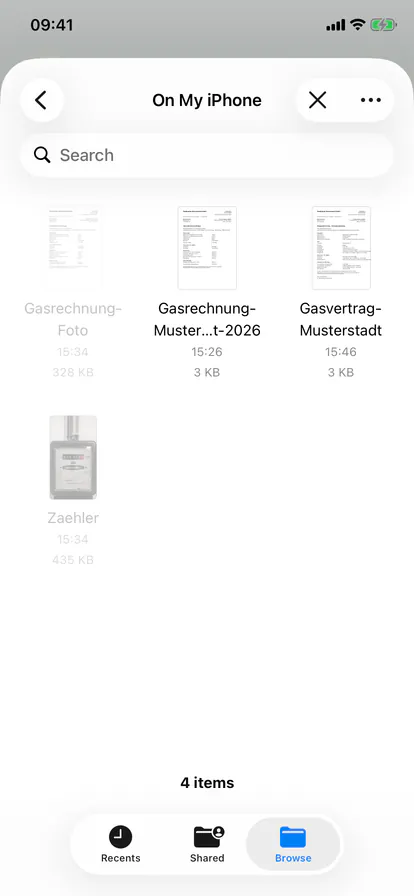
  3. In the file picker open Browse, then On My iPhone (or your cloud folder), and tap the PDF.
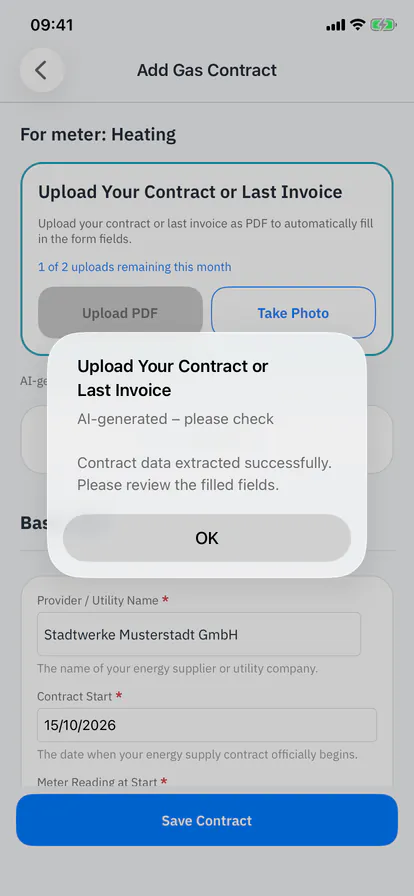
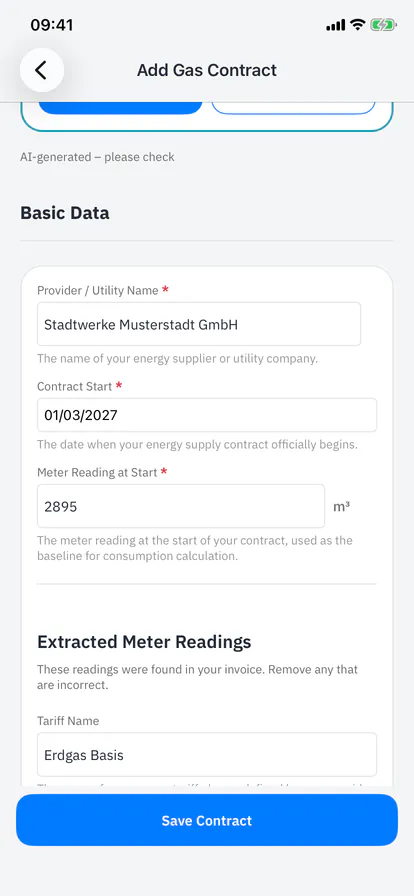
  4. Wait while "Analysing …" is shown. A dialog confirms the result: "AI-generated – please check".
  5. Tap OK and scroll through the form: provider, contract start, meter reading at start and tariff name are filled in.
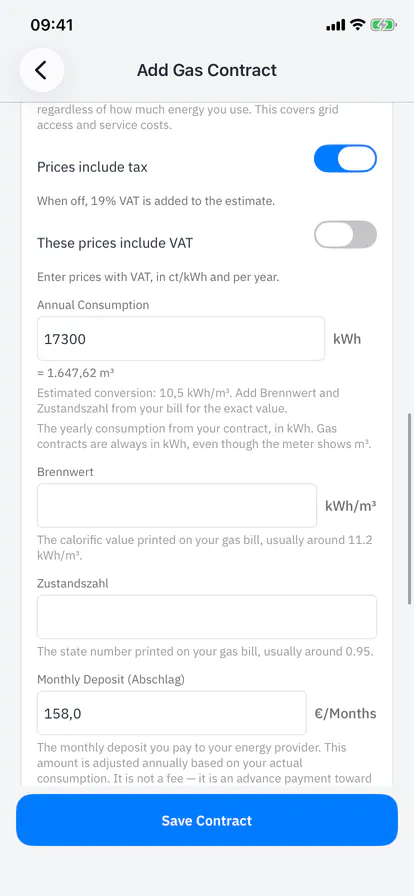
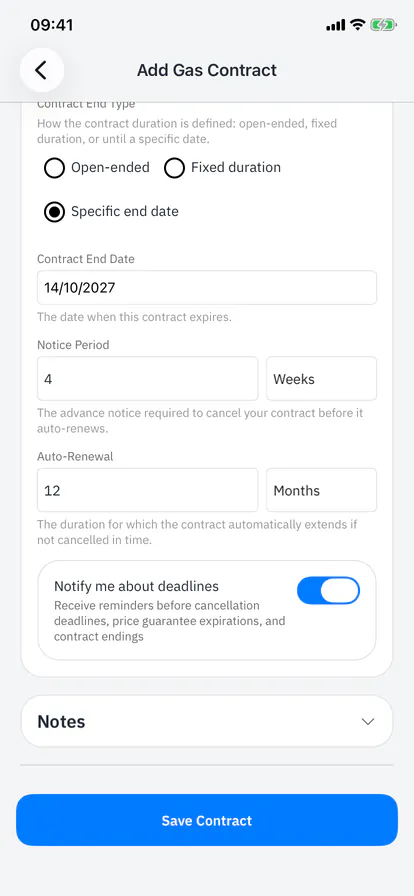
  6. Open Pricing and Contract Period: price per kWh, service fee, annual consumption, monthly deposit, end date, notice period and auto-renewal come from the document. Type anything the AI left empty, for example the price-guarantee months.
  7. Turn on "Notify me about deadlines" if you want reminders before the cancellation deadline and the contract end.
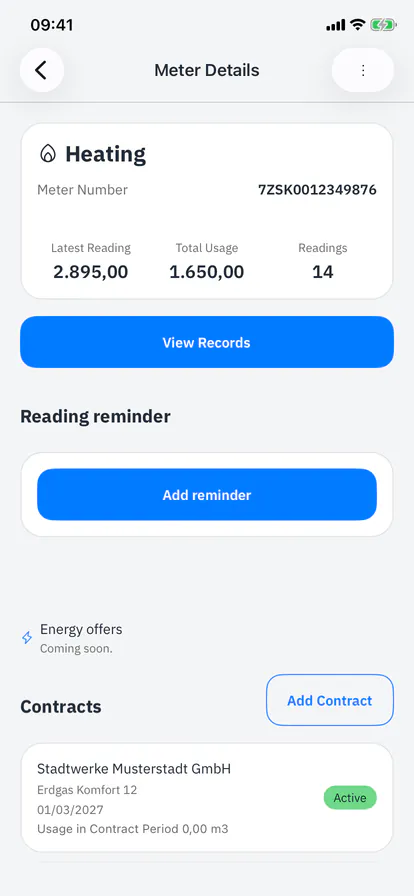
  8. Tap Save Contract. The contract appears on the meter page as Active.
  1. The upload card on the Add Contract form
    The upload card on the Add Contract form
  2. Choose the PDF in the file picker
    Choose the PDF in the file picker
  3. The result: AI-generated, please check
    The result: AI-generated, please check
  4. Pricing filled in from the document
    Pricing filled in from the document
  5. Contract period and deadline alerts
    Contract period and deadline alerts
  6. The saved contract on the meter page
    The saved contract on the meter page

Take care

  • Check every value against your document before you save: the AI can misread a number or a date.
  • An upload counts against your monthly allowance (2 per month and energy type). A document that is not an energy contract or bill is not counted.
  • A PDF must be smaller than 7 MB and contain text. For a paper contract use Take Photo and photograph each page.
  • If the dates overlap with a fixed-duration contract on the same meter, the app refuses to save: set the start date to the day after the old contract ends.
  • The meter reading at start becomes a reading on the readings page; correct it there later if needed.
  • The document is sent once to the AI service provider in Germany, is not stored there and is not used for training. You can withdraw the consent in the privacy settings.

Photograph a bill and let the AI read it

No PDF at hand? With an Activated Account you can photograph your last bill. The AI takes the prices, the yearly consumption and the meter reading from it; you complete the rest and save.

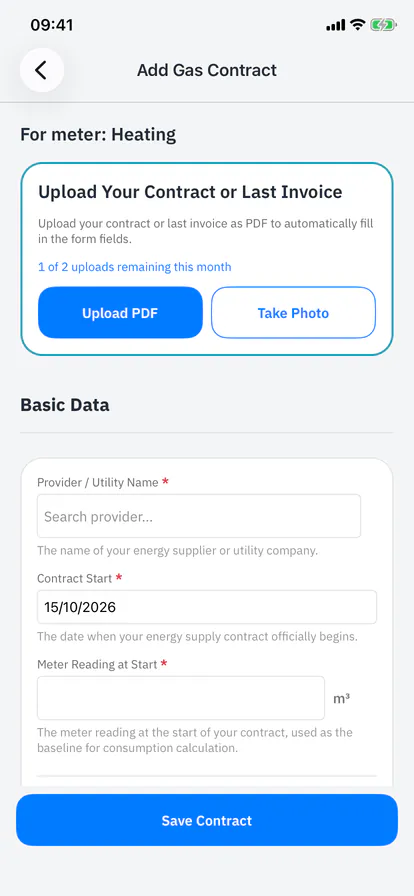
  1. Open the meter, tap Add Contract and then Take Photo in the upload card.
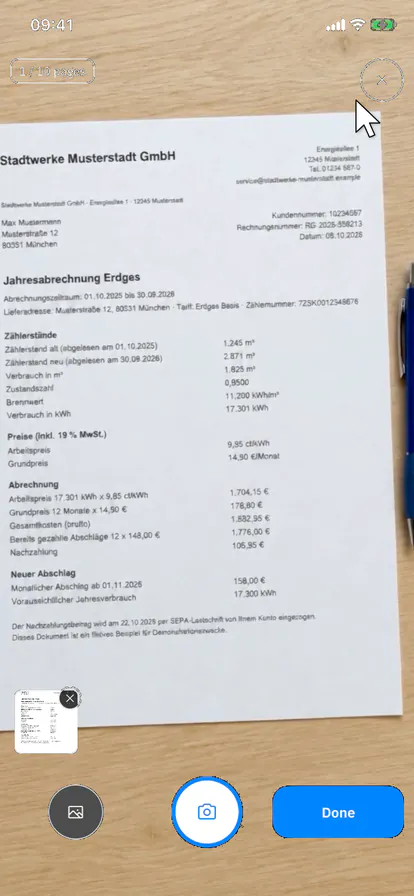
  2. Photograph each page with the round button, or tap the picture icon at the bottom left to pick photos you already have. The strip at the bottom shows the pages (up to 10).
  3. Tap Done. "Analysing …" is shown; a bill takes a little longer than a PDF.
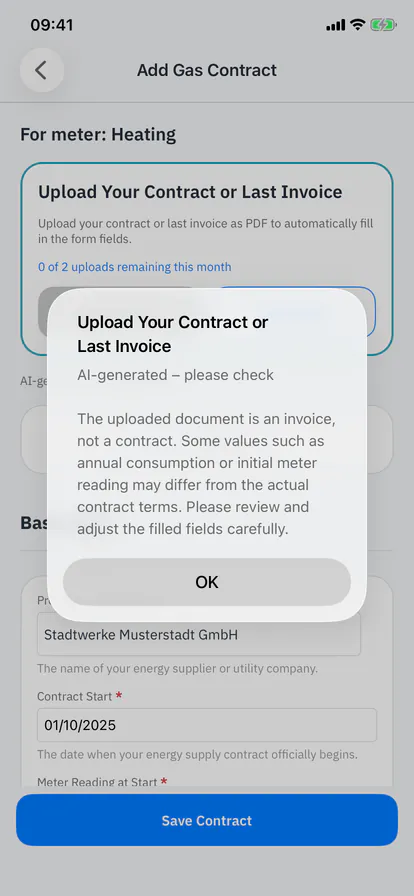
  4. The dialog tells you that the document is a bill, not a contract: some values can differ from your contract terms. Tap OK.
  5. Check Basic Data: provider, the start reading and the tariff name come from the bill. Readings the AI found on the bill are listed under "Extracted Meter Readings"; remove any that are wrong.
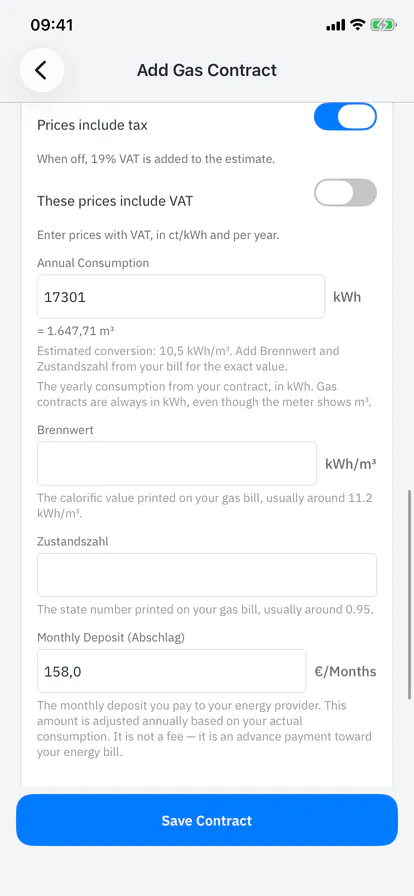
  6. Open Pricing: price per kWh, service fee, annual consumption and monthly deposit are filled in. Add Brennwert and Zustandszahl from the bill for an exact kWh conversion of a gas meter.
  7. Correct what belongs to the bill rather than to your contract: in the video the contract start is moved to the day after the previous contract ends and the start reading is set to the current reading.
  8. A bill carries no contract term, so Contract Period stays open-ended unless you know it. Tap Save Contract.
  1. Take Photo in the upload card
    Take Photo in the upload card
  2. The photographed page in the strip
    The photographed page in the strip
  3. The result: a bill, not a contract
    The result: a bill, not a contract
  4. Pricing filled in from the bill
    Pricing filled in from the bill
  5. Start date and start reading corrected
    Start date and start reading corrected
  6. The saved contract and its start reading
    The saved contract and its start reading

Take care

  • Photograph the page flat, in good light and without shadows; the whole page must be in the picture. Blurred photos give wrong numbers.
  • A photo upload counts like a PDF against the monthly allowance (2 per month and energy type). The pages are sent as one PDF of at most 7 MB.
  • The old reading on a bill is from the start of the billing period, not from today. Use it only if your contract really started then.
  • The app refuses a start date inside a fixed-duration contract on the same meter: set the start to the day after that contract ends.
  • A start reading lower than a later reading is refused when you save; the readings page shows which readings exist.
  • The photo is sent once to the AI service provider in Germany, is not stored there and is not used for training. You can withdraw the consent in the privacy settings.

Charts

Add a usage chart

A chart of a meter's usage on your Dashboard.

  1. Open the meter and tap Add Chart, or accept the prompt that appears after the second reading.
  2. Give the chart a name, for example "Weekly, last three months".
  3. Choose the time range and a colour.
  4. Save. The chart appears on the Dashboard.

Take care

  • A chart needs at least two readings. More readings give more detail.
  • You can save up to 12 charts. To make room, tap a chart on the Dashboard and choose Delete.
  • The chart shows the usage between readings. A reading reminder helps you keep it up to date.
  • For a solar meter with a feed-in price in the contract, an approximate earned amount appears under the chart.

Quick answers

Where do I find my meter number?

On the meter itself, usually on a label near the display, and on every energy bill.

What does the cloud icon mean?

Green: everything is backed up to your account. Gray: you are not signed in, or some changes are still only on this phone.

Do I need the AI features?

No. Everything works by hand. Photo reading and document reading are optional.

Does the app work offline?

Yes. Your data is stored on your phone. Backup and AI need internet.

More questions? See the FAQ.